Hogyan kezelheti az Omada eszközöket az internet különböző helyein az Omada Controller segítségével
Az eszköz automatikusan megjelenik a listában, ha a hálózaton észleli.
UDP 29810, TCP 29811, TCP 29812, TCP 29813, TCP 29814, TCP 29815 és TCP 29816 szükséges az eszközkezeléshez. Győződjön meg arról, hogy ezek a portok nyitva vannak a tűzfalban.
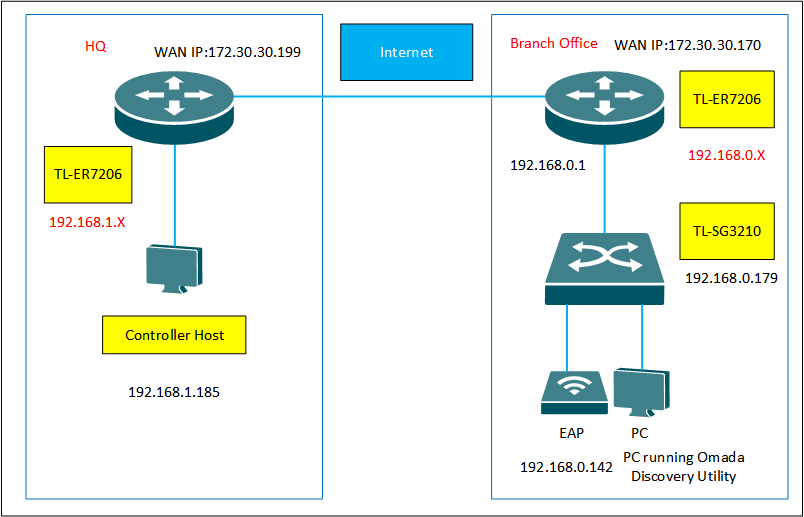
As shown below, HQ and branch office are connected with each other with the Internet. In HQ, there are TP-Link Omada Controller and TL-ER7206 in subnet 192.168.1.0/24. In the branch office, there are EAP660 HD, TL-SG3210 and TL-ER7206 in subnet 192.168.0.0/24.
Az alábbiakban látható módon a központ és a kirendeltség az interneten keresztül kapcsolódik egymáshoz. A központban a TP-Link Omada Controller és a TL-ER7206 található a 192.168.1.0/24 alhálózatban. A fiókirodában EAP660 HD, TL-SG3210 és TL-ER7206 található a 192.168.0.0/24 alhálózatban.
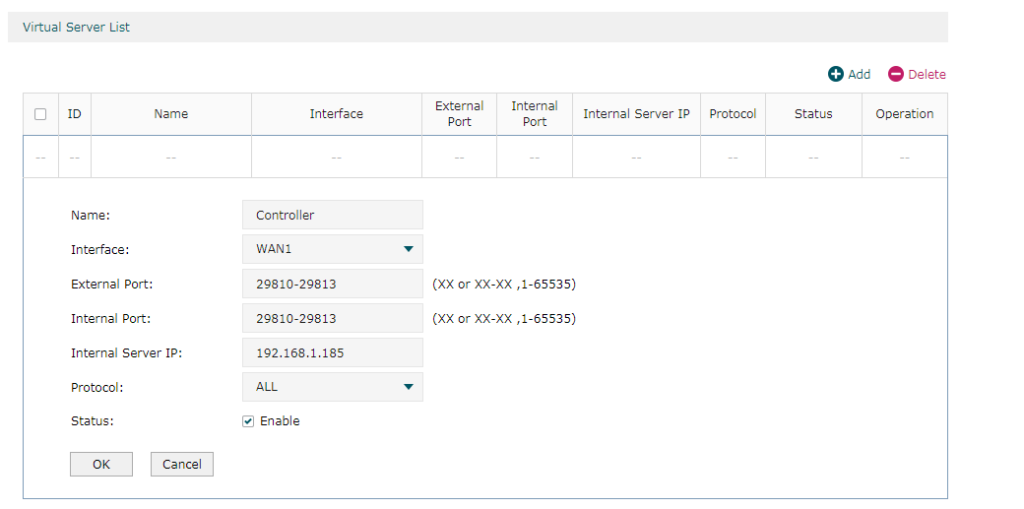
Step 1. Configure Port Forwarding rules on TL-ER7206 in HQ for Controller Host (192.168.1.185)
Please go to Transmission – NAT – Virtual Server and configure a virtual server for TCP&UDP port, ranging from 29810 to 29816.
Configuration screenshot of Port Forwarding in standalone mode.
- lépés: Állítsa be a porttovábbítási szabályokat a TL-ER7206-on a HQ-ban a Controller Host számára (192.168.1.185)
Kérjük, lépjen az Transmission – NAT – Virtual Server oldalra és állítson be egy virtuális szervert a TCP&UDP porthoz, 29810 és 29816 között.
Konfigurációs képernyőkép a Port Forwardingról önálló (standalone) módban.
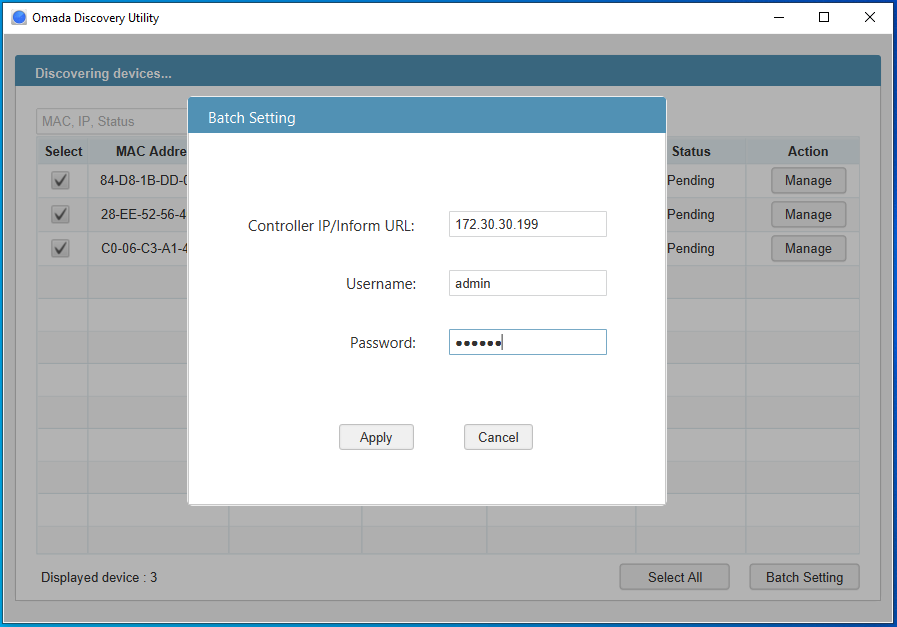
Step 2. Three methods for Omada Controller to discover the Omada devices in the branch office.
- Method 1: Discovery Utility
Run Omada Discovery Utility in Branch Office, select the Omada devices, and click “Batch Setting. Fill in the Controller Hostname/IP with WAN IP address of TL-ER7206 in HQ which is 172.30.30.199 and the Username/Password of the Omada devices. At last, click “Apply”. The default username/Password of the devices are admin/admin. If the Username and Password of Omada devices are not the same, please manage the devices one by one.
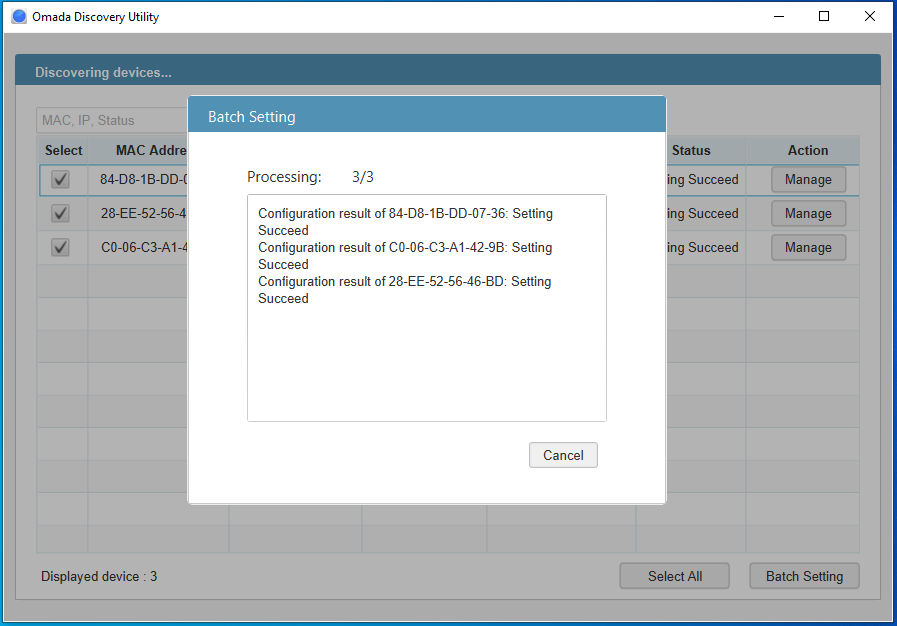
Configuration screenshot of the Omada Discovery Utility
- lépés: Három módszer az Omada Controller számára az Omada eszközök felderítésére a fiókirodában.
- módszer: Discovery Utility
Futtassa az Omada Discovery Utility programot a fiókirodában, válassza ki az Omada eszközöket és kattintson a „Batch Setting” gombra. Töltse ki a Controller Hostname/IP-t a HQ-ban található TL-ER7206 WAN IP-címével, amely 172.30.30.199 és az Omada eszközök felhasználónevével/jelszavával. Végül kattintson az „Alkalmaz” gombra. Az eszközök alapértelmezett felhasználóneve/jelszava: admin/admin. Ha az Omada eszközök felhasználóneve és jelszava nem egyezik, kérjük, egyesével kezelje az eszközöket.
Az Omada Discovery Utility konfigurációs képernyőképe:
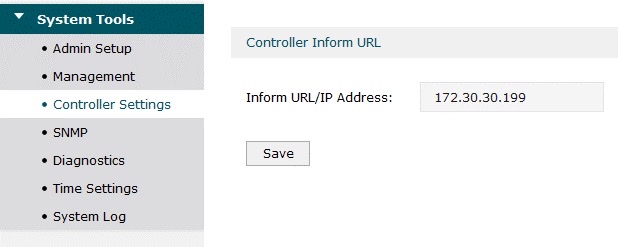
- Method 2: Controller Inform URL
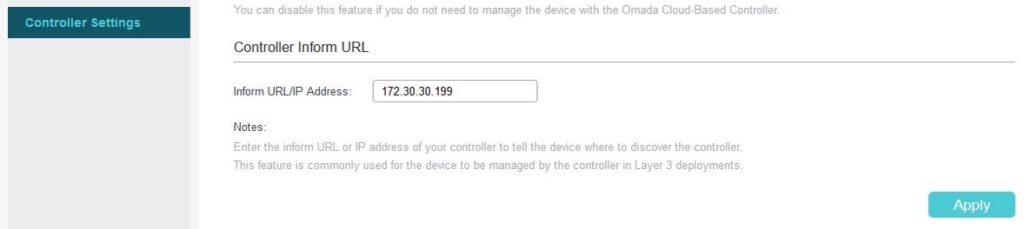
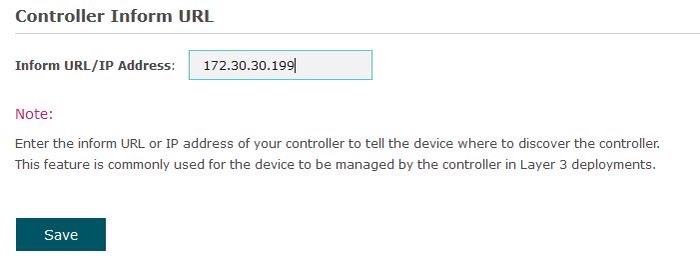
In Standalone mode, please go to System Tools/System-Controller settings of every Omada device, fill in the Controller IP/Inform URL with the WAN IP address of TL-ER7206 in HQ which is 172.30.30.199. Then click Apply.
Configuration screenshot of TL-ER7206 Controller Settings in standalone mode.
- módszer: Vezérlőinformációs URL
Önálló módban lépjen a System Tools/System-Controller beállításokhoz minden Omada eszközön, és töltse ki a Vezérlő IP/Inform URL-jét a HQ-ban található TL-ER7206 WAN IP-címével, amely 172.30.30.199. Ezután kattintson az Alkalmaz gombra.
Konfigurációs képernyőkép a TL-ER7206 vezérlő beállításairól önálló módban.
Configuration screenshot of TL-SG3210 Controller Settings in standalone mode.
Configuration screenshot of EAP660 HD Controller Settings in standalone mode.
- Method 3: DHCP Option 138
Use Omada Discovery Utility or set Controller Inform URL to adopt the TL-ER7206 in branch office. And then go to Settings > Wired Networks > LAN > Networks, click in the ACTION column of the LAN where the DHCP clients are located. Enable DHCP Server and configure common DHCP parameters. Then click Advanced DHCP Options and specify Option 138 as the controller’s IP address, which is the WAN IP of TL-ER7206 in HQ. Click Save.
To make DHCP Option 138 take effect, you need to renew DHCP parameters for the DHCP clients. One possible way is to disconnect the switch and EAP and then reconnect them.
Note: If you do not use Omada Gateway, you also can use DHCP Server which supports option138 feature to finish the configuration.
Configuration screenshot of DHCP138 in Omada Controller.

Step 3. Adopt the Omada devices in Omada Controller.
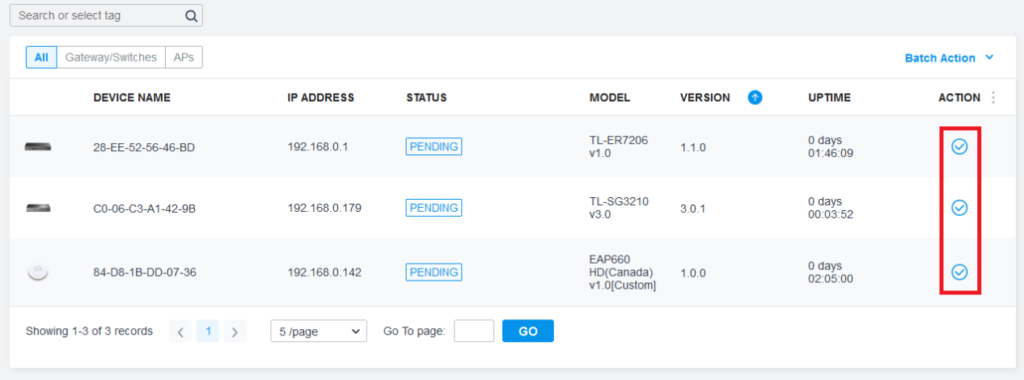
After finishing the configuration of the Omada devices in the branch office will appear in the “pending” list of Omada Controller, which means you can click the tick button in the red circle and manage these devices now.
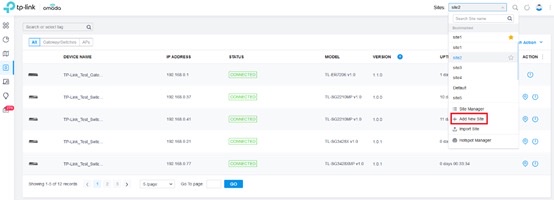
Note: If you have adopted a gateway in the default site, please click “Add New Site” in the drop-down list of Sites and configure the parameters of the branch office. Because one site can only adopt one gateway.
Screenshot of Add New Site in Omada Controller.
- lépés: Fogadja el az Omada eszközöket az Omada Controllerben.
A fiókirodában lévő Omada eszközök konfigurálása után megjelennek az Omada Controller „függőben” listájában, ami azt jelenti, hogy a piros körben lévő pipa gombra kattintva kezelheti ezeket az eszközöket.
Megjegyzés: Ha az alapértelmezett webhelyen átjárót fogadott el, kattintson az „Új webhely hozzáadása” elemre a Sites legördülő listájában, és konfigurálja a fióktelep paramétereit. Mivel egy webhely csak egy átjárót fogadhat el.
Képernyőkép az Új webhely hozzáadása az Omada Controllerben:
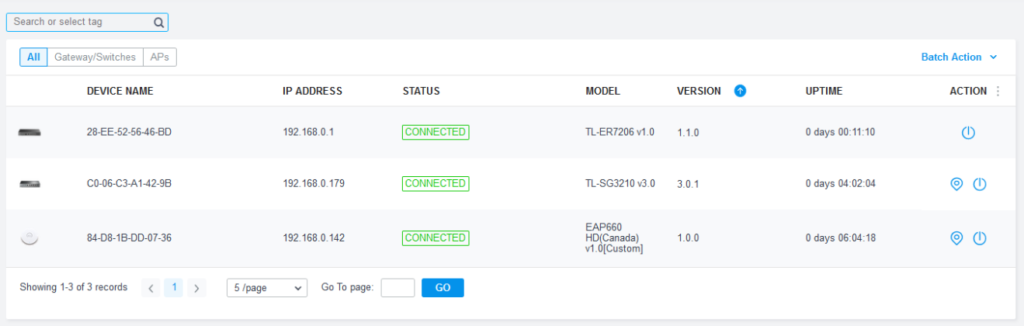
Screenshot of Omada devices in Omada Controller.
Képernyőkép az Omada eszközökről az Omada Controllerben: